|
Keith Coyle - Only Perfect Practice Makes Perfect
Ready For Action!
The second in a series of coaching articles!
 Continuing on with the topic of “Perfect Practice Makes Perfect”, seen in Junes issue of H & S, where we have started to look at the basic skills required to create that perfect shot, having established and I hope “practiced” the correct method of mounting the Gun up to the face and aligning the rib with the master eye, we need to review what other basic elements are required for the shooter to get “Ready For Action”.
Before starting your round of Clays, it’s vitally important to check on your “Master Eye”, you will be surprised how many of us experience gradual changes of eye dominance due to factors such as simple tiredness or fatigue caused by working long and late hours looking at a computer screen (or playing computer games). This means a once dominant right eye will diminish while the left eye becomes stronger, the result being, for right handed guns, is that they end up missing the target by shooting to the left of it.
There are many “Technical” ways you can check on your eye dominance but the easiest, most effective and in my opinion the best way is to do this simple pointing exercise;
Pick out an object in your middle distance, top of a tower or mast for example, now, if you’re right handed, with both eyes open and without any conscious thought, using your left hand index finger, point straight at the top of the object.
Now close your left eye, if your Index finger is still pointing directly at the object, you have a right “master eye “, perfect!, if not and you are pointing to the left of the object and you then have to realign your finger to the right to make contact, that means your finger during the pointing process has travelled up under your left eye, showing instinctively, that is the dominant one.
So this is exactly what will happen to your barrels, if you mount the gun with both eyes open, being right handed and having a left dominant eye, you will miss making contact with the target by coming up to its left.
So for our Left Handed shooters just reverse the exercise using you right hand index finger to do the pointing. The sample diagram shows the shooter using his biased hand to point, that’s OK, but I prefer to use the hand that guides the gun during this exercise, however it clearly indicates how the master eye dictates your ability to accurately Point!.

For most of us, the simple way to counteract having an opposite dominant eye is to close it. This should be done before the gun is mounted, if not, the gun up shooter, when putting the stock in the cheek, will invariably roll their head over the comb trying to get their dominant eye in line with the rib, this then causes all sorts of additional problems. For the gun down shooter, the opposite dominant eye must be closed before the mount begins otherwise the barrels will travel up under this eye during the process, meaning if you shut the eye as the gun comes into your face, you will waste valuable seconds in trying to realign the barrels to make contact with the target. The system I suggest is, to look for the target with both eyes open, once you have positive visual contact, shut the eye, then move and mount the gun.
It’s not always that easy for certain people to shut their dominant eye when its opposite to their biased hand and this particularly applies to Females, who unlike Males use both sides of their Brain, this gentlemen I’m afraid is a proven medical fact. My Wife Brenda is a classic example; she is a right handed shot with a left dominant eye but does not have sufficient muscle control to close her left eye independently of the right. Therefore when she shoots, she wears safety glasses with a patch that covers the pupil of her left eye, this allows light in to the eye and allows some peripheral vision, leaving her ability to judge perspective (distance) only marginally affected and means the right eye can be the main receiver of visual information, making it the eye that points the finger and subsequently the barrels at the target.
Eye dominance is one of those many shooting topics that in my opinion ‘Never Has So Much!, Been Written by So Many!, About so little!”, yes of course, years ago if you were a wealthy young aristocrat and did not have to work for a living, you would either have spent many uncomfortable hours under the stern eye of an instructor learning to shoot off your opposite shoulder or spent a fortune on having a “Cross Over Stock’, handmade for you by a well known fine gun maker. These days learning to shut your eye at the right time or investing in a pair of shooting glasses with a patch on, is by far the most cost effective and simplest solution for an “Opposite Dominant Eye”.
So, we have now looked at the proper way to mount the gun, the correct way to stand (Stance) and how to check for eye dominance, leaving as the last of the essential basics to look at, is ”Gunfit”.
Over the last 25 years of professional coaching I have lost count of the shooters who have arrived at the Shooting School and when I asked what was the problem/s they were experiencing when shooting, they responded by saying “I just can’t seem to hit a thing’. In many cases it was a small wonder as they had been shooting with a gun that did not fit them.
The subject of Gun fit can be quite an involved one, especially when you talk about having a Shotgun hand built by a one of the Leading Fine Gun makers. It takes many years for a shooting instructor to be accepted as a gun fitter by these prestigious organizations, as it is considered more of an art than a science, which can only be learnt from experience and knowledge passed down to a lucky few from the most respected of English instructors, such as Chris Craddock, Roger Silcox, Ken Davis and the renowned Sam Grice.
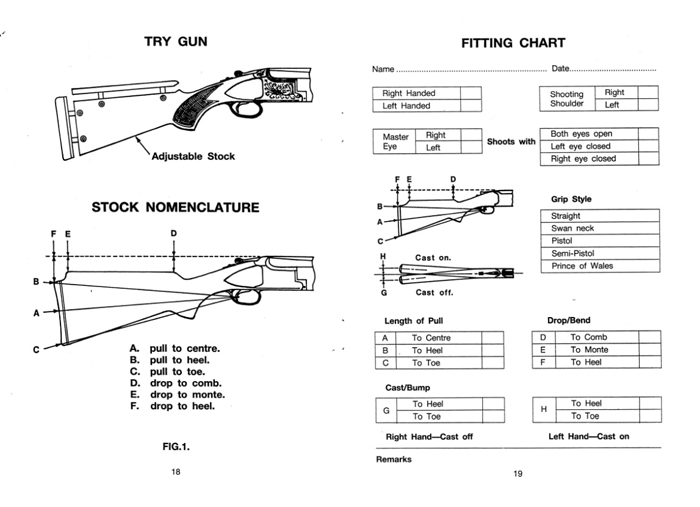
So for the average shooter the first thing to appreciate is that Gun Fit comes down to three basic measurements, stock length, comb height and cast. The most crucial of these is the Stock length, as this dictates the degree of application for the other two and is the one we base the purchase of our Shotgun on, whether it feels right when we pick it up and the quality of the wood the stock is carved from.
Few people realize that stock length affects comb height and cast, lengthening the stock will effectively drop the comb height and increase the cast, the reverse then applies so if you shorten the stock you raise the comb and reduce the cast. The understanding of this geometry has become more important since the recent introduction of factory produced Shotguns with self adjustable stocks and butt plates, because if you’re adjusting one of those dimensions it will automatically alter the other two. So if you are an owner of one of these Guns, think carefully about what you want to achieve before you get the turn keys out and start making alterations.
 How do we ensure that when we are in the shop looking to purchase a new gun, we get the right length stock? A good basic guide for Skeet, Sporting or Wing Shooting (Game) guns, is to mount the gun in the correct manner, with both hands using the parallel action, then get the assistant or a friend, using their fingers, to measure the gap between the tip of your nose and the front tip of the comb, a gap of 2 to 3 fingers is fine, this should result in the iris of your eye sitting on top of the rib. Less of a gap will place your eye too high and so you will shoot high, also there will be a tendency to suffer some bruising to your nose and mouth as well as an increase in the effects of recoil. If the gap is too large, say four fingers, it will be much harder to mount the gun smoothly and efficiently, you will run the risk of bruising your upper arm and shoulder. The worse thing is, with your head too far back down the comb your eye will end up below the rib and you will lift your head up and away from the comb to see the target just at the point when you squeeze the trigger, this will get you a nice bruise on the cheek as well as missing the bird.

Stock Too Long Stock Too Short Stock Length Right.
There is one thing with regard to gun fit that always frustrates me when I am at a shoot and that is seeing someone shooting with their front hand extended too far forward on the Forend wood, this in effect lengthens the stock and restricts the movement (especially vertical) towards the end of the swing and invariably pulls the gun down off line and away from the bird. Then there is of course another reason, it could indicate the stock is far too short and the front hand is naturally trying to find the right position to compensate. Ideally your front hand should be placed so that the tip of your extended index finger sits ľ up the Forend.
Correct Front Hand Placement

In this photo we see the that the “Stock is too Long and front hand too far forward” if you look closely you will see this shooters eye is sitting below the rib, he will invariably lift his head at the last second to see the target, moving his cheek and eye away from the gun . That means his barrels will not be pointing where his eye is looking and he will Miss Behind. Also his hand is too far forward, so this is making his stock even longer and as he is shooting a high driven target, he will pull the gun off line and miss the target to the left.

In this picture we see the reverse, the stock is too short and the front hand is at the front of the Forend trying to compensate, it will mean poor muzzle control again, as well as getting some bruising to the face by the time he gets to the end of his round. You will also see because the stock is too short he is having to mount the gun across his chest, his left shoulder is forward which means he is shooting his shotgun like a rifle and will severely restrict his ability to move to his left.

I’m sure when some read this article they will say “Here’s someone else sitting in his armchair dishing out wisdom and advice but “Does this really work and Does it really matter”. Well ten days ago I gave a lesson to a business colleague at the Jebel Ali Shooting Club in Dubai. My Pupil, Mike, is an extreme sportsman, a keen Motorbike Safari Rider, Yacht Skipper and a Pilot, so you could say he has excellent hand and eye co-ordination skills, a big advantage when shooting clays and good news for me as his coach.
As always the lesson started with a short brief on the principles of shooting a moving target, i.e. point don’t aim, not shooting a single projectile you’re putting a cloud of pellets on the anticipated flight path of the target etc., etc.
So first we check his master eye and do the simple pointing test;

Master Eye Check.
Next step is to get the correct stance and develop the correct method of mounting the gun using both arms in that parallel action:

We then begin with some basic incoming targets to introduce shooting with a moving gun, keeping the eye in contact with the clay and to get the front hand and the index finger used to doing the work and pointing at the bird.

As expected Mike took on board and applied all the information I was giving him and by twenty minutes had developed an excellent technique. By halfway through the hour I was introducing more testing targets for him to shoot which included left and right crossers, Climbing Teal and the Rascally Rabbit.
His success ratio by the end of the lesson was 98% and hadn’t wasted a single cartridge, his gunmout technique continually improved to a point where in the last five minutes I introduced shooting “Gun Down” to him.
Being a dedicated sportsman, Mike totally understands that when you start a brand new sport getting a Lesson with Professional Coach is the best thing to do, even if you think you know a bit about it already. With Clay shooting it can also save you a lot of money in the long run by not wasting cartridges and just making holes in the sky in the belief that’s all you have to do to improve. He now knows what to look for when he goes off to buy his first gun and what to do, to ensure that it fits him, but most importantly he understands the vital essential requirements of “Safe Gun Handling & Safe Shooting” that will make him an acceptable visitor to any clay ground worldwide.
Just a note to finish, take a look at the Photo of Mike as he shoots a climbing teal target, look at his stance, look at how the gun is perfectly in line with his eye and how he is using the front hand and index finger to point.

Then take a look at the photo of the gentleman attempting to shoot clays for the first time, this is not staged, it was sent to me by a friend in England who went to a local shoot. He is no doubt doing his best and what he thinks is the right way to shoot but compare it with Mike and you decide who’s got it right. Oh! And if you think it’s the chap in the camouflage clothing come and see me for a lesson!!!!!!!.

So now having covered all the basics and we are now “Practicing Perfectly, We Are Ready For Action”, so in the next article we shall start to look at how we put all this good technique into achieving that “Straight Round and Perfect Score Card.
Keith Coyle,
Member of the Institute of Clay Shooting Instructors, CPSA Senior & Academy Coach,
Proprietor of the “Classic Wing & Game Safaris’ sporting agency.
Sporting Clays & Simulated Game Shooting Course designer, Shooting Range designer for both Commercial Shooting Clubs and Military facilities.
For Private Lessons & Personalized Gun fitting, Accompanied Instruction in the Field, Coaching Courses, Master classes & Corporate programs, Keith can be contacted on +971 50 741 1429, email keith@classicwingandgame.com
* Posted with permission of Keith Coyle.
|
|


